Template Typography
Creating Beautiful Content With Simple Code
Typography is a fundamental part of a template, providing you with the tools to characterise your content and bring it to life. There is a vast array of typography available with Clarion template, as is with our previous releases, from list styles, notice blocks and a diverse number of other elements.
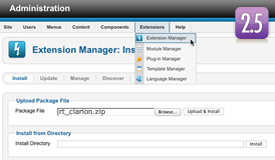
If you are using the TinyMCE editor for HTML typography, go to Extensions → Plugin Manager → TinyMCE 2.0 → Set Code Clean-up on Save to Never.
<h1> Heading Styles
H1. Heading 1
H2. Heading 2
H3. Heading 3
H4. Heading 4
H5. Heading 5
H1. Component Page Title
H1. Component Content Title
<ul> List Styles
- This is an example of a standard list style. Lorem ipsum dolor sit amet, consectetur adipiscing elit. Donec sit amet nibh.
- This is an example of a standard list style. Lorem ipsum dolor sit amet, consectetur adipiscing elit. Donec sit amet nibh.
- To use this style create a list in the following format: <ul class="dots"><li>....</li><li>....</li>...</ul> (HTML).
- To use this style create a list in the following format: [list class=" dots"][li]....[/li][li....[/li][/list] (ROKCANDY).
<p> DropCap Styles
Praesent rutrum sapien ac felis. Phasellus elementum dolor quis turpis. Vestibulum nec mi vitae pede tincidunt nonummy. Vestibulum facilisis mollis neque. Sed orci. Cum sociis natoque penatibu. Pellentesque vel enim urna, sit amet blandit ipsum. Maecenas quis sem sit amet nunc pretium mattis. Sed dapibus semper est, sed pretium erat.
Use the following format: <p class="dropcap">...</p> (HTML) or [dropcap class="dropcap"]...[/dropcap] (ROKCANDY). You can use any letter, symbol or number.
Praesent rutrum sapien ac felis. Use this format: <p class="dropcap2">...</p> (HTML) or [dropcap class="dropcap2"] ... [/dropcap] (ROKCANDY)
Praesent rutrum sapien ac felis. Use this format: <p class="dropcap3">...</p> (HTML) or [dropcap class="dropcap3"] ... [/dropcap] (ROKCANDY)
Praesent rutrum sapien ac felis. Use this format: <p class="dropcap4">...</p> (HTML) or [dropcap class="dropcap4"] ... [/dropcap] (ROKCANDY)
Praesent rutrum sapien ac felis. Use this format: <p class="dropcap5">...</p> (HTML) or [dropcap class="dropcap5"] ... [/dropcap] (ROKCANDY)
<blockquote> Styles
To replicate, use the following formatting: <blockquote><p>....</p></blockquote> (HTML) or [blockquote class="default"]...[/blockquote] (ROKCANDY).
Praesent rutrum sapien ac felis. Phasellus elementum dolor quis turpis.
To replicate, use the following formatting: <blockquote class="alignleft"><p>....</p></blockquote> (HTML) or [blockquote class="alignleft"]...[/blockquote] (ROKCANDY).
Lorem ipsum dolor sit amet, consectetur adipiscing elit. Mauris metus tortor.
Praesent rutrum sapien ac felis. Phasellus elementum dolor quis turpis.
To replicate, use the following formatting: <blockquote class="alignright"><p>....</p></blockquote> (HTML) or [blockquote class="alignright"]...[/blockquote] (ROKCANDY).
Lorem ipsum dolor sit amet, consectetur adipiscing elit. Mauris metus tortor.
<pre> Code Styles
This is a sample <pre class="lines">...</pre> (HTML) or,
[pre2 class="{lines}"] ... [/pre2] (ROKCANDY) tag:

div.modulebox-black div.bx1 {
  background: url(../images/box_bl.png) 0 100% repeat;
}

div.modulebox-black div.bx2 {
  background: url(../images/box_tr.png) 100% 0 repeat;
}
This is a sample <pre>...</pre> (HTML) or,
[pre class="{lines}"] ... [/pre] (ROKCANDY) tag:

div.modulebox-black div.bx1 {
  background: url(../images/box_bl.png) 0 100% repeat;
}

div.modulebox-black div.bx2 {
  background: url(../images/box_tr.png) 100% 0 repeat;
}
<p> Notice Styles
This is a sample of the Approved style. To replicate, use the following syntax: <p class="approved">....</p> (HTML) or [notice class="approved"] ... [/notice] (ROKCANDY).
This is a sample of the Attention style. To replicate, use the following syntax: <p class="attention">....</p> (HTML) or [notice class="attention"] ... [/notice] (ROKCANDY).
This is a sample of the Notice style. To replicate, use the following syntax: <p class="notice">....</p> (HTML) or [notice class="notice"] ... [/notice] (ROKCANDY).
This is a sample of the Alert style. To replicate, use the following syntax: <p class="alert">....</p> (HTML) or [notice class="alert"] ... [/notice] (ROKCANDY).
<span> Text Icon Styles
To replicate, the following format: <span class="text-icon iconname">...</span> (HTML) or [icon class="icon name"]...[/icon] (ROKCANDY). The class names are listed below, such as "text-icon email".
<em> Emphasis Styles
This is a emphasis tag that allows you to highlight words or phrases. Use the following format: <em class="italic">...</em> (HTML) or [emphasis]...[/emphasis] (ROKCANDY)
This is a emphasis tag that allows you to highlight words or phrases. Use the following format: <em class="bold">...</em> (HTML) or [emphasisbold]...[/emphasisbold] (ROKCANDY)
This is a emphasis tag that allows you to highlight words or phrases. Use the following format: <em class="bold2">...</em> (HTML) or [emphasisbold2]...[/emphasisbold2] (ROKCANDY)
This is a emphasis tag that allows you to highlight words or phrases. Use the following format: <em class="highlight">...</em> (HTML) or [highlight class="default"]...[/highlight] (ROKCANDY)
This is a emphasis tag that allows you to highlight words or phrases. Use the following format: <em class="highlight white">...</em> (HTML) or [highlight class="white"]...[/highlight] (ROKCANDY)
This is a emphasis tag that allows you to highlight words or phrases. Use the following format: <em class="highlight black">...</em> (HTML) or [highlight class="black"]...[/highlight] (ROKCANDY)
This is a emphasis tag that allows you to highlight words or phrases. Use the following format: <em class="highlight green">...</em> (HTML) or [highlight class="green"]...[/highlight] (ROKCANDY)
This is a emphasis tag that allows you to highlight words or phrases. Use the following format: <em class="highlight yellow">...</em> (HTML) or [highlight class="yellow"]...[/highlight] (ROKCANDY)
This is a emphasis tag that allows you to highlight words or phrases. Use the following format: <em class="highlight blue">...</em> (HTML) or [highlight class="blue"]...[/highlight] (ROKCANDY)
This is a emphasis tag that allows you to highlight words or phrases. Use the following format: <em class="highlight red">...</em> (HTML) or [highlight class="red"]...[/highlight] (ROKCANDY)
<ul> List Styles (Icons)
To replicate, use the following format: <ul class="list-icon icon_name"><li>....</li><li>....</li>...</ul> (HTML) or [list class="list-icon icon_name"][li]....[/li][li....[/li][/list] (ROKCANDY). The icon names are listed below, such as "cart".
<ul> List Styles (CSS3)
These list styles are based on the latest CSS3 techniques and are designed to work in modern browsers (will not display properly in IE6-IE8).
To replicate, use the following format: <ul class="class name"><li>....</li><li>....</li>...</ul> (HTML) or [list class="class name"][li]....[/li][li....[/li][/list] (ROKCANDY). The class names are listed below, such as "checkmark red".
- Checkmark
- Checkmark
- Circle-Checkmark
- Circle-Checkmark
- Square-Checkmark
- Square-Checkmark
- Checkmark Green
- Checkmark Green
- Checkmark Yellow
- Checkmark Yellow
- Checkmark Red
- Checkmark Red
- Checkmark Blue
- Checkmark Blue
- Checkmark White
- Checkmark White
- Triangle-Small
- Triangle-Small
- Triangle
- Triangle
- Triangle-Large
- Triangle-Large
- Triangle Green
- Triangle Green
- Triangle Yellow
- Triangle Yellow
- Triangle Red
- Triangle Red
- Triangle Blue
- Triangle Blue
- Triangle White
- Triangle White
- Circle-Small
- Circle-Small
- Circle
- Circle
- Circle-Large
- Circle-Large
- Circle Green
- Circle Green
- Circle Yellow
- Circle Yellow
- Circle Red
- Circle Red
- Circle Blue
- Circle Blue
- Circle White
- Circle White
<span> Inset Styles
Praesent rutrum sapien ac felis. Phasellus elementum dolor quis turpis. Vestibulum nec mi vitae pede tincidunt nonummy. Vestibulum facilisis mollis neque. Sed orci. Cum sociis natoque penatibus et magnis dis parturient montes, nascetur ridiculus mus. Inset Right TitleYou will need to use the following formatting: <span class="inset-right"> <span class="inset-right-title"> .... </span> ... some content ... </strong> (HTML) or [inset side="right" title="Inset Right Title"] ... some content ...[/inset] (ROKCANDY) Vestibulum facilisis mollis neque. Sed orci. Cum sociis natoque penatibus et magnis dis parturient montes, nascetur ridiculus mus. Sed euismod magna a nibh.
Praesent rutrum sapien ac felis. Phasellus elementum dolor quis turpis. Vestibulum nec mi vitae pede tincidunt nonummy. Vestibulum facilisis mollis neque. Sed orci. Cum sociis natoque penatibus et magnis dis parturient montes, nascetur ridiculus mus. Inset Left TitleYou will need to use the following formatting: <span class="inset-left"> <span class="inset-left-title"> .... </span> ... some content ... </strong> (HTML) or [inset side="left" title="Inset Left Title"] ... some content ...[/inset] (ROKCANDY) Vestibulum facilisis mollis neque. Sed orci. Cum sociis natoque penatibus et magnis dis parturient montes, nascetur ridiculus mus. Sed euismod magna a nibh.
Sed euismod magna a nibh. Praesent rutrum sapien ac felis. Phasellus elementum dolor quis turpis. Vestibulum nec mi vitae pede tincidunt nonummy. Praesent rutrum sapien ac felis. Phasellus elementum dolor quis turpis. Vestibulum nec mi vitae pede tincidunt nonummy. Vestibulum facilisis mollis neque.
Cum sociis natoque penatibus et magnis dis parturient montes, nascetur ridiculus mus.Praesent rutrum sapien ac felis. Phasellus elementum dolor quis turpis. Vestibulum nec mi vitae pede tincidunt nonummy. Vestibulum facilisis mollis neque. Sed orci. Cum sociis natoque penatibus et magnis dis parturient montes, nascetur ridiculus mus.

